ANGELIQUE MINIATURES CELEBRATES 28 YEARS TODAY!

STORE BANNER HORIZONTAL PNG


To celebrate this anniversary I thought I would share some pictures of my favourite doll projects from more recent years (since digital cameras and the internet!!!).

From fairies and fantasy to historical characters, I have thoroughly enjoyed each and every one of them. The planning, research and actual creating never fails to excite me and I look forward to each new project that comes my way, so please enjoy my selection:

Anne Boleyn costume for 16 inch fashion doll.

Anne Boleyn costume for 16 inch fashion doll.

Miniature Fairy riding a unicorn.

Miniature Fairy riding a unicorn.

 Princess Diana wedding gown on miniature mannequin.

Princess Diana wedding gown on miniature mannequin.

 Miniature late Victorian Summer Bride.

Miniature late Victorian Summer Bride.

Custom made Aurora Rose tutu for 16 inch ballerina doll.

Custom made Aurora Rose tutu for 16 inch ballerina doll.

Miniature Giselle or Sylphide tutu set.

Miniature Giselle or Sylphide tutu set.

Miniature Fairy Slippers (shown with an English penny and American five cent piece).

Miniature Fairy Slippers (shown with an English penny and American five cent piece).

Miniature Fairy Flower Seller with her unicorn companion and helper.

Miniature Fairy Flower Seller with her unicorn companion and helper.

Miniature Brown silk bonnet with shirred ivory silk lining and matching reticule.

Miniature Brown silk bonnet with shirred ivory silk lining and matching reticule.

Miniature striped cotton walking dress with matching tall bonnet and reticule.

Miniature striped cotton walking dress with matching tall bonnet and reticule.

Something for the Maid. A much plainer miniature cotton house dress and apron along with a little mop cap.

Something for the Maid. A much plainer miniature cotton house dress and apron along with a little mop cap.

18th Century Marie Antoinette style gown modelled by 16 inch Tyler Wentworth. Made in pure silk.

18th Century Marie Antoinette style gown modelled by 16 inch Tyler Wentworth. Made in pure silk.

Miniature Dita Von Teese style gown and hat. one twelfth style.

Miniature Dita Von Teese style gown and hat. one twelfth style.

 Valentine Ball gown for 16 inch fashion doll.

Valentine Ball gown for 16 inch fashion doll.

Miniature Faerie of Spring and New Life.

Miniature Faerie of Spring and New Life.

Miniature Princess Grace wedding gown on mannequin.

Miniature Princess Grace wedding gown on mannequin.

The miniature Elizabeth Bennett Regency wedding bonnet.

The miniature Elizabeth Bennett Regency wedding bonnet.

Front view of the miniature Fairy Harp. The harp stood about six and a half inches tall.

Front view of the miniature Fairy Harp. The harp stood about six and a half inches tall.

Miniature Young King Henry VIII and Katherine of Aragon.

Miniature Young King Henry VIII and Katherine of Aragon.

Miniature Queen Jane Seymour.

Miniature Queen Jane Seymour.

 Miniature King Richard III with his wife Queen Anne Neville.

Miniature King Richard III with his wife Queen Anne Neville.

Miniature King John and his wife Queen Isabella.

Miniature King John and his wife Queen Isabella.

Miniature Elizabeth 1st doll complete in room setting.

Miniature Elizabeth 1st doll complete in room setting.

Miniature Scrooge.

Miniature Scrooge.

Miniature Ross and Demelza Poldark.

Miniature Ross and Demelza Poldark.

Miniature tricorn hat.

Miniature tricorn hat.

Miniature Anne Boleyn and Thomas Cranmer.

Miniature Anne Boleyn and Thomas Cranmer.

Battle of Flodden (c 1513) Scottish Pikeman outfit for action figue (around 12 inches tall).

Battle of Flodden (c 1513) Scottish Pikeman outfit for action figue (around 12 inches tall).

Coronation robes for 17 inch male fashion doll.

Coronation robes for 17 inch male fashion doll.

Victorian underwear for 16 inch fashion doll.

Victorian underwear for 16 inch fashion doll.

'Romanza' ballet costume for 16 inch ballerina doll.

‘Romanza’ ballet costume for 16 inch ballerina doll.

French (Breton) costume for 16 inch doll.

French (Breton) costume for 16 inch doll.

Alice in Wonderland costume for 12 inch fashion doll.

Alice in Wonderland costume for 12 inch fashion doll.

Miniature Lord Byron Albanian costume.

Miniature Lord Byron Albanian costume.

Miniature Lord Byron Regency tail coat outfit.

Miniature Lord Byron Regency tail coat outfit.

And last but not least:

Medieval style Autumn costume for 16 inch fashion doll.

Medieval style Autumn costume for 16 inch fashion doll.

Miniature Queen Mary 1st (Mary Tudor).

Miniature Queen Mary 1st (Mary Tudor).

I hope you have enjoyed my selection…just a few of the many favourites I have created over the last few years. All of them have given me enormous pleasure and taught me such valuable skills and patience.


THE MAKING OF A TUDOR ANNE BOLEYN STYLE ENSEMBLE FOR 16 INCH FASHION DOLLS.

TUDOR COSTUME FRONT

As some of you know, I do love a challenge. I also LOVE Medieval, Tudor and Elizabethan costume. Having made many Anne Boleyn style miniature dolls, I thought it was time to challenge myself with the creation of an Anne Boleyn style Tudor costume to fit the popular sized 16 inch fashion dolls.

Miniature (1/12th scale) Anne Boleyn (and Cranmer) doll.

Miniature (1/12th scale) Anne Boleyn (and Cranmer) doll.


A while ago, I bought a lovely ‘Nu Mood Breathless’ doll by Robert Tonner of the USA. The Nu Mood dolls are very good, in that they don’t have rooted hair and wear wigs that can be changed. So, they can suit many different styles and costumes.

I had my Nu Mood doll repainted by the very talented doll re-painter, Melissa Mehan and after the re-paint, I felt that this doll (now called Isabelle Rose) would suit a Tudor ensemble very well.

The Tonner 'Breathless' doll before her new face paint.

The Tonner ‘Breathless’ doll before her new face paint.


After the face paint and 'Isabelle Rose' is born.

After the face paint and ‘Isabelle Rose’ is born.

I had looked at several Tudor doll costumes on the internet (all of them no longer available) and I wanted to see if it would be possible to achieve a more authentic shape for my doll.

Having researched Tudor costume thoroughly over many years with my miniature dolls, I knew the pattern shapes I needed to design to achieve the right look and so I spent about two weeks making and ‘tweaking’ the patterns for this costume.

The first big design decision came with the underpinnings….what would give the skirts the shape required?

I had the choice of a wired farthingale or a stiff net petticoat.

I knew that it was possible to make a real farthingale as I had made something very similar years ago, but I also realised that, bearing in mind the costume was to be offered for sale, I had to consider the cost of such a complicated and time-consuming piece.

Sure, it would be totally authentic…..but it would also take a very long time to construct and therefore would add a huge amount to the cost of the costume.

So I decided to make a stiff net petticoat that would do the job just as well and be more economical financially.

After all, it would be hidden under the top clothes and it was the top clothing that was supposed to be the star attraction.

The stiff net petticoat provided all the support that was needed, at a much less cost...and time.

The stiff net petticoat provided all the support that was needed, at a much less cost…and time.


Next to consider was the under-skirt. The centre panel is designed to be revealed by the opening in the front of the main gown skirts. I chose a beautiful pure silk two-tone dupion, with a woven fleur-de-lys pattern. I stitched the panel onto a plain petticoat of very fine lining. So far, so good…..it was all going to plan.

The plain underskirt with fancy silk centre panel.

The plain underskirt with fancy silk centre panel.


I decided to tackle the main gown bodice next, as I knew the fit might prove to be a bit problematic. So, part of my pattern ‘tweaking’ was to make the bodice up in kitchen roll to check the fit on the doll. (You can just see a piece of the white kitchen paper in the picture above).

The entire top gown would need to be lined in pale coloured lining, as dark fabrics can stain a doll’s ‘skin’, so I made up the bodice in lining fabric just to double check the fit… and all was fine.

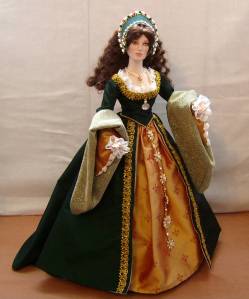
The over-sleeves needed to be made in two sections: an upper and lower section, so I made these up in lining too, just to check the length and fit. All worked well first time (phew!) so I cut the bodice and sleeves in the main fabric, a beautiful dark green two-tone taffeta that I had kept in my stash for many years…….I knew it would be perfect for something!

The top sleeves are folded back to reveal a gold net lining.

The top sleeves are folded back to reveal a gold net lining.

Once the main bodice was almost complete, I added a frill of soft white lace to the neckline, to replicate the frill from a shift that would have been worn underneath by a real person. Whilst it is possible for a doll to wear all this extra underwear, it is better to keep any bulk to an absolute minimum to preserve a good shape….after all, dolls can’t be pulled in with corsets like real people can!

The main bodice, decorated with soft white lace and a little crystal pendant.

The main bodice, decorated with soft white lace and a little crystal pendant.

The main gown skirts were quite easy to make and I was glad I had decided to add a slight train to the centre back length. For ease of dressing, I attached the bodice to the main skirt. (On a real person, these would have all been separate pieces (even the sleeves) and all would have been pinned into place).

The back of the main skirt with its train.

The back of the main skirt with its train.

I found a lovely necklace in a sale that I was able to take apart and re-fashion into a jewelled hanging belt, which I then attached to the over-gown.

Now that the main part of this costume was completed, I then worked on the false under-sleeves which I decided to match with the centre front skirt panel. These too had to be lined so that there was no chance of the doll being stained by the fabric.

False under-sleeves are lined to prevent staining to the doll.

False under-sleeves are lined to prevent staining to the doll.

I also matched the lace frills at the wrist edge to the frills at the neckline, to preserve continuity within the costume.

The little puffs on the lower edges were hand-stitched using wide silk ribbon. On a real person, these would have been the sleeves of an under-gown or shift, pulled through the openings of the false sleeves.

The completed under-sleeve showing the silk puffs.

The completed under-sleeve showing the silk puffs.

The headdress, known as a French Hood, caused more than a few headaches for me as the shaping was quite complicated. Made in two parts, it took an awful lot of ‘tweaking’ to get the right fit, size and shape….but I got there in the end.

The French Hood headdress shown from the side.

The French Hood headdress shown from the side.

The only change I made was to add snap fasteners to the centre back of the hood as I felt that this would make it easier to dress onto a doll and fasten under her hair. I also added clear elastic under the chin, to help keep the headdress firmly in place.

Headdress shown from the back.

Headdress shown from the back.

Headdress shown from the front.

Headdress shown from the front.

Once again, I chose to line the headdress with pale coloured fabric, just to be on the safe side. I also chose to leave out the back section, usually a black silk tube, as I wanted the doll to show off her lovely hair. (It is entirely possible that young women did sometimes wear their hair loose with these headdresses, and they are certainly depicted this way in many films and dramas. Of course, short of actually travelling back in time, we can’t be certain….but it does look very pretty!)

The final part of the ensemble was a necklace and I chose to make the Anne Boleyn ‘B’ necklace. I searched high and low for a suitably sized ‘B’ and eventually found one in silver….which I painted gold with metallic paint. The rest of the necklace was made by stringing pearl beads onto thread and attaching a pearl bead drop to the ‘B’.

Close up of the 'B' necklace.

Close up of the ‘B’ necklace.

The costume was finally complete and I was very pleased with the result…..but what shall I challenge myself with next? Any ideas?

TUDOR COSTUME SIDE RIGHT

TUDOR COSTUME SIDE LEFT

Although this perticular costume is now sold, it can still be ordered from me in similar colours or in a colour scheme to suit your own taste. Just contact me and ask for details.

ANOTHER BRAND NEW DOLL. YOUNG HENRY VIII: A NEW KING FOR A NEW ERA.


On 21st April 1509 the elderly King Henry VII died and his eighteen year old second son became King Henry VIII of England. Young Henry was taller than the average Tudor man, athletic, creative and handsome with a love of music and a keen interest in the latest fashions; quite a change from his dour, dull and penny-pinching father.

Thus started the reign of a most memorable and famous King who, through his decisions and actions

would determine the course of English history……….the turbulent Henrician era had begun.

The young Henry VIII. The eighteen year old fashionable dandy of his time.

 Having created my Young Katherine of Aragon doll first (see previous post), I wanted to match and tone the colours of Henry’s costume to those used for Katherine. I also wanted to give the feeling of youthfulness and hope which is why I kept the colour scheme light and fresh. It is also true that at this time (1509/10) the dour and dark colours of Henry VII’s reign did briefly go out of fashion for younger people. However, darker colours did return to fashion within the next few years although they were mainly used for accent rather than for a whole outfit.

(After the frugal Court of the elderly King Henry VII, the older courtiers must have had quite a shock when the vivacious new teenage King spent a fortune in brightening the ‘old place’ up for himself and his young, exotic Spanish bride. Henry VIII would become known for his lavish spending! )

In deciding the style of Young Henry’s costume, I designed it using a mixture of styles found in costume reference sources in books and on the internet . I also found the the following portrait of a very young Henry:

Portrait of a very youthful King Henry VIII.

 Henry’s hair style is typical of the very early Tudor era, worn long and straight; very different from the much shorter styles of the mid-Henrician era that we are more familiar with. The hat in this portrait is still quite Medieval in style being round with a turned up brim, decorated with brooches. The robe with its heavy and wide fur collar would continue for many years although in this early period, it is not as padded and large as it would become mid era. Below is a close up picture  of the top half of Young Henry:

Top half of Young Henry showing detail of hat, hair, 'fur' robe collar and jewellery.

 I chose to make a slightly different version of the hat with a more pointed crown but still with the turned up brim. It is difficult to see in this picture but the brim is also notched as was the high fashion of the time. As described in many contemporary descriptions, Henry has the auburn hair that he (and his children) were so famous for, styled loose and shoulder length as described before. You can just see the top of the fine silk shirt with its fancy gold band, over which there is a jewelled gold necklace with diamond shaped peridot pendant. I chose to make the V-necked doublet in pale almond green silk brocade to tone with the colouring on Katherine’s under-gown. The heavy jewelled chain around Henry’s shoulders is made from a metallic gold braid with flat backed pearls and crystals added to each section and joined at the centre front with tiny golden jewelled filigrees. Below is a close up of the lower half of Henry’s costume:

Close up of purse and (nervous cough!) the required codpiece!

 You can see from the picture above that the doublet finishes just below the waist and there is a fancy cord belt tied over it to hold the decorated leather purse. During this early Tudor period, the hosen (leg coverings) were still very Medieval in style and full-length, very much like our modern day tights (panty hose). (Later on the hosen would become more like stockings). During the 1500s it was still very fashionable for younger men to display their shapely legs fully. Although quite a delicate subject nowadays, the codpiece was also very important part of the gentleman’s costume. At this time it consisted of a triangular flap laced to the main part of hosen and was not padded or emphasised as in later fashions. It was merely practical to cover the privates but convenient enough to undo in order to pee.

I used a fine silk jersey fabric for Henry’s hosen and hand-dyed it to tone with the colour scheme used for Katherine. At first I dyed it to match Katherine’s under-gown but felt that the paler colour was too feminine for Henry so I decided to re-dye it a few shades darker. The codpiece caused me quite a lot of trouble regarding trying to make it look right and not ridiculous! Without any form of ‘filling’ in it, it looked wrong and with too much, it looked equally wrong. Having tried tiny amounts of cotton wool and then toy stuffing, I was about to give up when I noticed a little scrap of the silk jersey on the floor that had missed the bin. A few minutes of rolling, scrunching and hand stitching later, Henry’s annoying codpiece was annoying no more! Below is a close up of Henry’s leather shoes:

Close up of Henry's fashionable wide-toed leather shoes.

Once the problems of the hosen were overcome the shoes were quite simple to make. At this time, the slim, more pointed shoes of the Medieval period had given way to a new German-style fashion of very wide-toed shoes. These shoes were very flat and could be worn either with or without a strap across the instep and were often slashed to reveal a different coloured leather through the slashes. The width of the square shaped toes was often highly exagerated and much wider than the foot of the wearer, often being padded out inside………something that would also become popular with the robe and doublet of later times. Below is a close up of the robe and doublet sleeves:

Close up of Henry's slashed doublet sleeve and split hanging robe sleeve.

 I chose to make Henry’s robe from cream silk jacquard as I wanted to emphasise the freshness of youth and also not have him clash with the fabric used for Katherines gown. The length of the robe is fashionably short to just above Henry’s knees and the cream ‘fur’ trim (made from chunky chenille yarn) extends into the typical Tudor fur collar around the shoulders (you can see this better if you scroll back up to the full-length picture at the start of this post). I also added a fancy cream and gold braid for more opulence.

At this time, the sleeves of the robe were often very long (past knee length) and unpadded. If worn long, they were slashed about half way down the length for the wearer to put his arm through comfortably. Henry’s robe sleeves are also lined in a biscuit coloured silk which you can just see in the above picture. Slashing was an extremely popular German fashion and continued to be much favoured for most of the Henrician era. It was often seen on doublet fronts, shoes, sleeves and also in ladies sleeves later in the period too. You can see that Henry’s doublet sleeves are fashionably slashed at the elbows to reveal the silk of his shirt underneath.

Whilst Henry took a very long time to design and complete, I thoroughly enjoyed the challenge of his making. It is with poigniancy though, that I look back over the reign of this most memorable of rulers. For me there are so many ‘what ifs’ about Henry’s life. For example, what if his first son with Katherine had not died in infancy……..would that have made Henry different, I wonder? The start of Henry’s reign and also the start of his first marriage seemed to hold such promise for the future, such triumphs and victories. I have always felt that it was very sad that this particular love story ended so sadly and bitterly.

Henry and Katherine (together again if only in doll form)

 Until next time, bye for now!

A match made in Heaven?.....sadly it was not to be.

Brand New Doll: Young Katherine Of Aragon.

Hello! In between orders, I have been working on the latest doll to add to my Tudor miniature dolls line. Please let me introduce to you my ‘Young Katherine Of Aragon’:

Young Katherine of Aragon, dressed circa 1509/10.

 I have always felt rather sorry for this grand lady, whatever her faults may or may not have been and wanted to be able to portray her in her youth, in happier times. As many of you may well know, Katherine of Aragon was the first wife of the infamous King Henry VIII of England. However, Henry was not her first husband as she had been first married to Henry’s older brother Athur. The match between Katherine and Arthur was arranged by their parents Ferdinand and Isabela of Spain and Henry VII and Elizabeth of England when both were just toddlers. When Arthur reached the age of 14, Katherine, shortly before her 16th birthday, travelled to England for the marriage in 1501. Sadly the young prince died less than six months later, leaving Katherine a widow. Unable to return to Spain, the young teeneager was stuck in England under the protection of her miserly father-in-law Henry VII, who by all accounts, left her barely able to clothe her ladies in waiting, let alone herself.

During those difficult years, Katherine formed a strong friendship with Arthur’s younger brother, the robust and lively Henry and, by the time the old King died in 1509, that friendship had turned to love. The 18 year old Henry, now King Henry VIII of England, married the 23 year old Spanish princess and it is well documented that he was most taken with his young bride. It seems fair to say that the early years of their marriage were very happy with the young King being most attentive and openly romantic towards Katherine.

So, when I created this new doll, I wanted to try and capture the youth, hope and happiness of that early married life. In researching the young Katherine, I came across the fact that, she had pale auburn hair, NOT as I had always assumed for a Spaniard, black or dark hair. I also found this lovely painting of her, painted between 1501 and 1509 by court painter Michel Sittow:

The Young Katherine of Aragon.

 Since this portrait was painted before she married Henry, she is wearing more sombre colours than I have used for the doll. Henry VIII’s Court was very lively and vibrant, like him. Very unlike the dour seriousness of his father’s Court. Therefore I chose a rich gold silk jacquard for her over-gown with a paler, more youthful green for the under-gown, both popular colours for Royalty and the elite at that time. The style is that of around 1509/10, with the Medieval influence still visible alongside the more typical Henrician Tudor style. I have kept the head dress or ‘coif’ similar to the style in the painting and this would more than likely have been black for most married women.

Here is a close-up of the coif, jewellery and gown bodice. The tightly fitted over-gown bodice is open to reveal part of the green under-gown. Around the neckline, you can just see the edge of the lace from the shift she would have worn next to her skin. The lace is gold-edged, (Yep……..I painted that by hand!…….time consuming but worth it). There is also some more gold-edged hand-painted lace around the front of the coif and at her wrists.

Showing the individually applied jewellery, bodice detail and coif.

 The long hanging sleeves of the overgown are lined with a rich brocade of cream and gold. These long sleeves were typical of the late Medieval and early Tudor era and eventually developed into the wider, turned back sleeves of the middle Tudor period. 

Close up of the over sleeve lining detail.

 At this stage the sleeves of the under-gown were still tightly fitted but these developed into the large padded and fancy false under-sleeves more commonly associated with Tudor costume.

Close up of the end of the tight-fitting under-sleeve, also showing the gold edged lace cuff from the shift.

During the early 1500’s, ladies could wear either a tied belt around their waists or the more elaborate jewelled hanging belt. Since Katherine’s gown is rather an elaborate Court gown, I felt it looked better with the more formal hanging belt. The pearls and crystals were all individually applied to fancy black and gold braid with the addition of jewelled gold filigrees at the waist and at the end of the belt.

Close up of the jewelled hanging belt.

 I thoroughly enjoyed designing and creating this new doll and she is proving very popular, with collectors placing orders for her already. Of course I shall now have to work on a young Henry VIII to accompany her but for now it is only right that she has the centre stage and spotlight all to herself.

Until next time, bye for now!

Summer Solstice Is The Time To See All Things Fairy.

The Fairy Harpist miniature doll with hand customised fairy harp.

Hello everybody!

Each year around the 21st June is the Summer Solstice, the longest day of the year when the sun is nearest to the earth, here in the Northern Hemisphere. It is supposed to be the true start of Summer…..although with all the rain and lower temperatures than April here in the United Kingdom, I am begining to think that Summer has been and gone earlier this year!

The Summer Solstice is also supposed to be a very magical time  according to ancient legend and folklore. On this day at dawn or at dusk, if you are very lucky……you may just be lucky enough to see……….wait for it……….fairies! It is said that at these special times the veil between the world of humans and the world of The Fae  is very thin and you may just be able to glimse them dancing and celebrating, for fairies love to party. And if you see any fairies that need some shoes, please tell them that they can buy some from me in any colour they would like!

Miniature Fairy Slippers, just an inch long. Made in silk, with cotton lining and little leather soles. Shown with an English penny and a US five cent piece.

But just in case you don’t get to see any of them this year, I thought I would share some pictures of some of my own fairies with you instead. But before I do, you may remember a certain little Baby Fairy who donated herself as a prize in my competition in May. Baby Fairy is now enjoying a life of leisure in Wales and if you would like to hear all about her new home and new friends, let me know and I’ll see what I can do……….I’m sure she would be thoroughly delighted to tell you all about it!

I have loved all things FAIRY for as long as I can remember and I really love making them as miniature dolls. Below are some of my favourites made over the last few years.

I once came across a gorgeous artificial rose stem that leant itself perfectly to a mother and baby fairy snoozing together. The baby didn’t need any clothing so she had some tiny dried flowers and greenery in her hair instead. The mother I dressed in little chiffon petals.  The mother fairy just about fitted onto the lower, larger rose while the baby fitted easily into the small bloom:

Mother and baby fairy sleep soundly on separate flowers in 'Rose Dreams'.

 One of my favourite and most recent fairies was ‘The Fairy Flower Seller’, detailed in a previous post. This one took a very long time to make with all the tiny flowers to secure in place but was a very enjoyable project. I chose lavender over pale pink silk for this fairy and dyed the flowers to go with these colours. 

The Fairy Flower Seller with her pet unicorn who carries all the flowers for her.

 One of my most popular fairy ensembles has to be ‘Holding Court’, a miniature Fairy Queen with floral crown, sitting on a golden flower-decked throne. For this fairy I chose a shot (two tone) silk sold as ‘Blackberry’, quite a bold and dark purply pink with black cross weave. To contrast, the under-gown was made in pale pink silk with metalic gold fancy braid and gold criss-cross on the bodice. Again, all the flowers were hand-dyed to match and tone.

'Holding Court' miniature fairy ensemble.

 The throne origianally started as a plain stained wood, high-backed chair. It was hand crafted and bought on an online auction. I customised it by painting it with gold paint and glitter and then decorated it with filigrees, crystals and tiny hand-dyed dried flowers. I then added a little silk cushion (to match the fairy’s dress) with fancy braid and tassels. Here is a picture of the throne on its own:

The 'Holding Court' customised throne.

You may have noticed the ‘Fairy Harpist’ at the top of this page. She came about mainly because of some favourite music on a cd that I love to listen to when I am designing and creating my fairy folk. This is a cd of the beautiful (in my opinion) Victorian harp music, recorded by an equally beautiful harpist, Elizabeth Jane Baldry. The cd is called ‘Harp of Wild and Dreamlike Strain’ and is a collection of fairy-themed Victorian music never before recorded until Elizabeth Jane recorded it in the 1990’s. I believe it is still available and can be obtained from Elizabeth Jane’s web site (see link in blogroll or at the end of this post).

I chose the colours of bluebells for the Fairy Harpist’s gown as it was bluebell time when I created the first doll. Here are some other pictures of her silk dress:

Side view of the miniature Fairy Harpist.

Back view of the Fairy Harpist's gown.

I already had a miniature harp in my dollshouse so this was quickly ‘borrowed’ and customised with gold glittery paint, golden ribbon, filigrees, crystals and tiny dried flowers to match the Fairy Harpist. It took a long time to carefully secure all those flowers into the right places but was worth the time and effort.

Front view of the miniature Fairy Harp. The harp stood about six and a half inches tall.Back view of the miniature Fairy Harp.

 Well that is all for now, but if you have enjoyed this post please leave me a little message as I would love to hear from you.

If you would like to see Elizabeth Jane’s web site please click here.

If you like miniatures please do take a look at the latest AIM (Artisans in Miniature) online free magazine here.


THE BELLS ARE RINGING FOR HIM AND HIS GIRL (PART TWO)

There see!……..I told you I’d be back, didn’t I?

 It was just impossible to fit in all the wedding gowns that I wanted to share with you last time in one post, so without further ado, here are a few more:

Remember I told you about Tracie, the lovely lady who has commissioned quite a few very interesting wedding gowns in miniature from me. She is the lady who owns the miniature church and holds exhibitions in it on her blog. (I hope that you were able to go and visit Tracie’s blog and see the wonderful miniature church and exhibits in it). Anyway, amongst Tracie’s interests is the Regency period, (the early 1800’s) that most elegant era at the end of the Georgian period but before the Victorian. Amongst the miniature Regency costumes that I was asked to make for Tracie was  the wedding gown of Lady Byron. I made this costume on a mannequin.

Miniature version of Lady Byron's Regency wedding gown.

 Tracie was lucky enough to be able to visit the costume museum in Bath in order to have a private viewing of Lady Byron’s wedding attire and was even allowed to touch it and take close-up photos of it!!!!!! I don’t usually feel envy but I have to admit I was almost emerald at that one!!

Despite being in quite delicate condition, Tracie was able to take some wonderful photos and the above interpretation in miniature is as a result of the pictures that she took. The real dress was made from light-weight cotton trimmed with cotton lace and is very plain compared to some of the celebrity wedding gowns that we are used to today. However, it was indeed bang on trend in it its simplicity for those times. My moniature version is also made from very fine cotton trimmed with narrow cotton lace that has been cut down from a much too wide lace.

Whilst at the costume museum, Trace was also able to see…….. and touch(……….excuse me while I just flush emerald again!!!) Lady Byron’s wedding pelisse (a pelisse is a type of ladies Regency long coat). The pelisse was made in creamy coloured silk and was apparently quite dirty, especially along the hem. This is probably not too unusual as the Byron’s were married in Winter. The real one had quite a warm lining which of course Lady Byron would have needed for a Winter wedding over that thin little cotton dress.

Here is my interpretation of the Lady Byron wedding pelisse, this time on a miniature doll (faceless to resemble a shop model) This miniature version was made in lovely pure silk satin, in a delicate beigy/creamy shade and made to look as if it is being worn over the dress:

Lady Byron miniature wedding pelisse.

Still on a Regency wedding theme, Tracie also commisioned some general wedding attire of this period including another pelisse, this time on a hanger and also two wedding gowns on mannequins and two Regency wedding bonnets. Here is the other pelisse, made in a beautiful cream silk jacquard edged with tiny braid:

The other miniature Regency silk wedding pelisse on a hanger.

 Here is the first of the wedding gowns and this one is quite fancy with a train and trimmed with plenty of lovely lace. This was made in ivory silk dupion:

A fancy miniature Regency wedding gown and matching bonnet.

 Below is a close-up picture of the matching wide-brimmed bonnet showing the detail on the back:

Close up view of the back of the Regency wedding wide-brimmed bonnet.

 This is the other Regency wedding gown…..much plainer in style but typical of the times. The gown was again made in pure silk dupion with an over-dress of silk jacquard:

Slightly plainer but still as charming miniature Regency wedding gown.

 But for me, one of the most favourite of miniature challenges was the little Regency veiled wedding bonnet, based on the one worn by the character Elizabeth Bennett in the 1990’s BBC TV production of Pride and Prejudice. The base was made in silk-covered card with tiny hand gathered silk tulle along the length of the bonnet, ending in a tiny veil at the back. Decorating the bonnet were bands of narrow braid and tiny hand-dyed dried flowers. The inside of the bonnet was also lined with silk and trimmed with lace:

The miniature Elizabeth Bennett Regency wedding bonnet.

 Not to be left out of the wedding dress fiesta, here are a couple of the larger dolls modelling theirs. First up is the Spring Bride wedding gown and veil modelled here by 16 inch Tyler Wentworth. This gown was made in ivory silk dupion ruched at the hem with little cream and yellow rose buds and worn over a petticoat trimmed with delicate cotton lace. Underneath was a stiff net petticoat to hold out the skirt.


Spring Bride modelled by Tyler.

Next is Clea Bella the 16 inch ballerina modelling a One Of A Kind long tutu called ‘Wedding Belle’  This one was made using a small remnant (a lucky find!) of embroidered and beaded organza and was placed over the net tutu layers. I managed to find a lace trim that was very similar to the border of the fabric and this was used both to trim the dress and the tulle veil. 

Wedding Belle modelled by Clea Bella.

Last but by no means least in the wedding own fiesta are two miniature dolls. The first one you have seen before in a previous post last year and this is the Late Victorian Summer bride. Dressed in ivory silk trimmed with cotton lace, this bride’s costume is typical of the 1870’s /1880’s.

Miniature Late Victorian Summer Bride.

Below is the other miniature bride and this time she dressed in a much earlier style based on the crinolines of the mid 1800’s. This is the Winter Bride wearing a coat of ‘fur’-trimmed cream silk jacquard with large bell-shaped sleeves and a matching cream ‘fur’ muff. The coat is worn over a full ivory silk skirt with a deep frill of delicate cotton lace along with a lace-trimmed blouse, embellished with timy crystals. On her head is a small matching bonnet with a dainty little tulle veil that drapes over the back of her hair.

Miniature Winter Bride.

Now before I go, I have one quick question for you. Here it is: Whilst the following creature has nothing to do with weddings (at least I don’t think it has!) what has it got to do with the month of April 

What does this beautiful dragon to do with the month of April?

What does this beautiful dragon to do with the month of April?

 Would you like a clue?……….OK………..the clue is: 23rd April.

If you think you know the answer, just for fun, leave me a message at the end of this post.

In the meantime, you might like to visit Tracie’s blog page to see her lovely costume (and other) displays in her miniature church.

Please also take a look at the latest AIM (Artisans In Miniature) on-line magazine here.

Until next time……bye for now.

THE BELLS ARE RINGING FOR HIM AND HIS GIRL! (PART ONE)

Yes, I know I said it last time but I can’t believe we are already into another month…..just where IS the year going?! All sorts of things are popping up in my garden, including yet more daffodils, more pear blossom and damson blossom too, plus pretty little forgetmenots and cowslips. The birds are singing, the bees are buzzing and Spring is definately springing now.

I recall a very old saying about Spring……. it is ‘when a young man’s fancy turns to thoughts of love’ and with a Royal wedding planned for the end of April, what a good time to share my wedding gown-inspired miniature dolls and doll costumes.

On the subject of Royal Weddings, I had some lovely commissions to do for a very nice lady called Tracie who wanted me to create some royal weddding gowns in miniature for her. I was asked to supply them on  miniature dolls but without the faces painted so that they would look like shop mannequins.

 One of these Royal wedding gowns was Princess Diana’s. Tracie and I discussed the fact that the real dress and veil train was 25 feet long which of course would be 25 inches in one twelfth scale……….quite a challenge to display, so we settled on a little over 12 inches. The dress was made from silk dupion with teeny-weeny micro crystals on the bodice and a veil of pure silk tulle. Tracie has a miniature replica of Princess Diana’s tiara which is not shown in my pictures as I took these before the doll was posted but here are some pictures of the Diana wedding gown (without tiara):

Front view of the Princess Diana wedding gown.

I had to squash the train and veil up a bit to fit it all in the front vew photograph but here is a back view taken looking down on the gown:

The back view of the Princess Diana wedding gown train and veil.

I also decided to take a side view picture, again looking down on the doll from above:

Side view of the Princess Diana wedding gown, showing train and veil extended.

Another very famous and royal wedding gown that Tracie commissioned from me was that of Princess Grace of Monarco. I absolutely adored making this one! It took a bit of doing as there is even more work in this than in the Princess Diana gown but I had such a lovely time creating it.

Again, the main part of the gown was made in pure silk dupion with a tiny patterned embroidered lace over-bodice. The veil was made in pure silk tulle edged with tiny cotton lace, cut and applied to create the design. The headdress was quite an elaborate affair with lace and lots of teeny pearls, all individually placed. The whole creation took many, many hours (of wonderful creative bliss!!) to complete but was well worth the time. Here are some full length pictures:

Front view of the miniature Princess Grace wedding gown.

Again I had to squash the train and veil round to show it all in a front view picture but here it is:

Front view of the Princess Grace wedding gown with the train and veil in view.

Here is a back view taken from slightly above to show the back of the gown and  the lace fishtail panel in the gown train. You can also see more detail on the veil in this picture:

Princess Grace wedding gown from the back, showing the lace fishtail panel in the train.

 As I mentioned, the headdress was quite small but very fancy and required a lot of detail and time. Here is a view of just the head and shoulders showing the headdress from the front:

Princess Grace head and shoulders shot showing the bodice detail and the front of the headdress.

 And last but not least, a close up showing the detail at the back of the headdress:

Picture taken from above showing the intricate detail on the back of the Princess Grace wedding headdress.

 In the past, I have also made an adaptation of Queen Victoria’s wedding gown both in miniature and for a sixteen inch doll. The miniature version was made with pure silk dupion and cotton lace. The jewellery was made up of individually applied tiny crystals. This miniature doll was made quite some time ago so I apologise for the quality of the picture (it might be a bit ‘grainy’):

Miniature Queen Victoria in wedding gown.

Here is the one I made for the sixteen inch doll, modelled by Tyler Wentworth. This larger adaptation was made in ivory satin with tulle and lace veil:

Front view of the sixteen inch Queen Victoria wedding gown.

And also a back view of this costume:

Back view of the sixteen inch version. showing train.

 Of course, not all famous wedding gowns are made for royalty. Some wonderful examples exist that were once worn by celebrities on their special days.

Amongst the celebrity wedding dresses that I made for Tracie were also those of Joan Kennedy and her sister in law Patricia. I was asked to make these on display dummies. Here is my miniature version of Patricia’s silk satin wedding gown and silk tulle veil. Patricia’s dress was quite plain in style with a lovely fitted bolero jacket. The plain tulle veil was attached to a little shaped headdress:

Miniature version of Patricia's wedding gown and veil on display dummy.

  Joan’s veil and dress were more detailed. The dress had more fullness than Patricia’s and had sleeves and a fitted pointed bodice. The veil was also more detailed and had quite a bit of lace applied to the tulle so I will show this separately. Here is Joan’s silk satin dress together with the silk tulle and lace veil firstly:

Miniature Joan Kennedy wedding gown with veil on display dummy.

Here is Joan’s veil shown opened out to display the applied lace. Each of the lace motifs were cut and applied separately to the tulle, as was the scalloped (and the plainer) border:

Miniature version of Joan Kennedy's wedding veil.

 Although I was not asked to make Jackie Kennedy’s wedding dress (oooh I would have LOVED to but Tracie already had this one), I was asked to make her veil and it was very detailed indeed. Here are two pictures of Jackie’s veil, made in silk tulle with applied lace:

My miniature version of the Jackie Kennedy wedding veil shown draped here.

Here is a picture of the veil shown opened up to display all the lace detail. Again, as with Joan’s veil, all the lace motifs and borders were individually cut and applied to the plain tulle to create this lavish detailing. The veil was gathered onto a little round lace cap. Although it took quite a long time to achieve, I hope that you will agree that the effect was well worth the effort:

Miniature Jackie Kennedy wedding veil in silk tulle and lace.

 Since this has been quite an epic blog posting, I have decided to come back with part two in a couple of weeks, since I don’t want to bore you all to sleep!

In the meantime, you might like to visit Tracie’s blog page to see her lovely costume (and other) displays in her miniature church.

Please also take a look at the latest AIM (Artisans In Miniature) on-line magazine here.

Until next time……bye for now.

MARCH IS HERE WITH SHAMROCKS AND DAFFODILS.

Gosh! Doesn’t time fly? It was only last week that I was writing February’s blog, wasn’t it?!!!  And yet here we are already in March.

Although the daffodils and crocuses are already out here, the wind is still chilly and reminding us the Winter may not have finished with us just yet. But lots of buds and pretty flowers and blossoms are starting up so Spring is definately on her way.

The season of Spring has inspired many a doll and costume for me, not least my Faerie Of Spring and New Life. This miniature one twelfth scale doll is dressed in the colours of Spring leaves and snowdrop white with flowers of daffodil yellow and forgetmenot blue. Her trusty steed, a snowy white unicorn accompanies her as she carries her little baby in a flower-filled basket.

The Faerie of Spring and New Life.

 On the subject of daffodils, it was St.David’s day on 1st March. St. David is the patron saint of Wales and the daffodil is the Welsh national flower. So in honour of all my Welsh friends and readers, here is a ballet costume that I designed and made several years ago for the 16 inch ballerina doll, Clea Bella. This costume was inspired by some lovely miniature artificial daffodils that I was lucky enough to find. I used them to decorate Clea’s hair and she is also holding some as she dances.

Clea Bella modelling the Spring tutu with mini daffodils.


Talking of patron saints, March also sees the celebration of another famous saint, St. Patrick, the patron saint of Ireland and the Irish national flower or plant is the lovely shamrock.

The shamrock has inspired many a doll costume for me but I have often found that obtaining shamrock fabric has been like looking for a needle in a haystack. One would have thought that it would be so easy to get hold of it here in England, especially with Eire being just over the water but, would you believe, I had to buy it all the way from America!

Here is a costume that I designed with some gorgeous shamrock fabric (from America!). It was well worth the search as it was just the perfect scale for Clea Bella again in this eighteenth century inspired dance costume called ‘Erin and the Magic Shamrocks’.

Clea Bella dances the part of 'Erin' in the shamrock fabric costume.


Whilst buying the shamrock fabric that I used for ‘Erin’ I came across some lovely shamrock trimming. It was a wide and a narrrower embroidered lawn that just happened to be the right length for a long tutu for Clea called ‘Shamrock Waltz’. The wide trim was about six or seven inches deep with green shamrocks dotted all over. The narrower trim was about an inch and a half wide with a scalloped border and matching shamrocks. I was able to cut a bodice front with a shamrock right in the centre. The bottom of the skirt had the narrower trim along the lower edge and this was also used for shoulder frills and a headdress.

Clea Bella modelling 'Shamrock Waltz' long tutu.


Not to be outdone, little Riley was in desperate need of a tutu but there was just not enough of the trimming left. So I used plain satin in white and emerald to make her her own little shamrock costume called ‘Shamrock Sweetie’. I desperately tried to buy more of that lovely trimming but sadly, to date, have never been able to find any more of it. It was such a shame as it was pure cotton and so lovely and fine….just perfect for doll work.

Little Riley Kish in her 'Shamrock Sweetie' tutu costume.


With all this talk of Ireland how could I resist talking about Irish dancing? I would have loved to have learnt Irish dancing but it was not to be. How lovely it would have been to be able to dance wearing some of those wonderful dresses that the girls get to wear. And those costumes take some making too. There is so much time and work in them.

I found making an Irish dance costume for Clea quite a challenge but I was not going to let it beat me and with a lot of practice, I was able to make a pattern to fit her. I used pure silk dupion for the dress, lining and cape and some pretty little foil shamrocks finished off the decoration just nicely.

Clea wearing her 'Call of Eire' Irish dance dress.


Here is Clea Dancing so that you can see the lining colour. The fabric on the centre front of the bodice and the ends of the sleeves is a patterned gold lame.

Showing the gold coloured lining of the skirt.


And here is the back view showing the cape.

Back view of Clea's Irsh dance dress.


Of course, it wasn’t very long before one of the Kish girls wanted an Irish dress so it was back to the pattern drafting table for me. Although the Kish girls are the same height as Clea, they are a totally different shape around! I used silk dupion again along with the gold lame but decided to use an ivory colour with an emeral green lining. Unfortunately the camera wouldn’t show up the richness of the emerald and washed it out a bit which was a great shame so you will have to imagine a real, rich emerald green.

Miss Kish models 'Kished in Eire'.


Here is Miss Kish showing off her skirt lining that you have to imagine is rich emerald.

She couldn't dance as well as Clea but how could I refuse her the dress?!


Here is the back of the costume showing the machine embroidery on the cape.

Back view of 'Kished in Eire' dance dress.


Another image of Spring, apart from the flowers, are some of the animals that are associated with this season. Not least are the little Spring lambs jumping around in the fields. So cute and funny to watch.

 Last year I was asked to make a Georgian lady costume pattern for the British miniature magazine that I write ‘How to’s’ for. I chose the Shepherdess costume. This was a fashion craze in the eighteenth century for rich ladies to dress up as shepherdesses. They apparently found the image of the lonesome shepherdess rather romantic and wanted to portray this in the way they dressed.

Many of them even kept little lambs on their lawns and pretended to look after them! Maybe this is where the nursury rhyme of Little Bo Peep came from……it seems that she wasn’t a very good shepherdess and was always losing her sheep! Anyway, here is the miniature Georgian Shepherdess along with her little lambs in a pretty counrtyside setting.

Miniature Georgian lady in fancy shepherdess costume, complete with decorated crook and lambs.


Of course I just couldn’t close without giving a little mention to the little Spring or Easter Bunnie (even thought Easter is so late this year!) So here is little six inch tall Riley Kish in her cute pink bunnie outfit.

One cute little pink bunny outfit, modelled by Riley.


If you enjoyed reading this March post please don’t be shy and leave me a little comment if you have the time please. I love to hear from my readers.

Also, don’t forget to take a look at the AIM (Artisan’s In Miniature) on-line magazine. It is full of lovely, lovely miniature things by some wonderful miniature artisans. Click here to go straight there or you can use the AIM link in my blog roll on the right of my What’s New blog page.

Costumes inspired by St. Valentine’s Day.

Hello again,

I thought I would share with you some of the costumes and miniature dolls that I have made over the past few years that have been inspired by St. Valentine’s Day……can’t believe we are into February already! Where did January go?!!

Anyway, below is one of my favourites originally created for 16 inch Clea Bella but it also works well in one twelfth scale miniature. This ball gown is based on those worn in the 1870’s and has a bustle and train at the back. Below are the pictures of the 16 inch version, made in pink silk:

16 inch Clea Bella models the Valentine Ball gown (side view)


Back view of the ball gown showing puff detail, train and tails.

The front view of the ball gown showing frills and trim.


Below is the miniature version of this lovely ball gown but this time shown on a mini  dress stand (or dummy) rather than a doll. I found that I was able to use the same trim for both sizes with no problems:

Front view of the miniature Valentine Ball gown.The flowers are a mixture of hand-dyed dried and hand-made silk.

Back view of miniature version.


Side view of the miniature Valentine Ball gown.


Of course, pink is not the only popular colour used for costmes inspired by St. Valentine’s Day. Red is probably the most used and several years ago I found a gorgeous cotton fabric with tiny red hearts all over it.

I found that the fabric was suitable for miniature dolls and larger doll costumes alike. Here are some examples of costumes using this very versatile fabric:

16 inch Kish doll wearing 'Sweet Valentine Kishes' costume.


16 inch Clea Bella wearing 'Valentine Polka' ballet costume.


Miniature dolls. The Queen wears the heart fabric for her under dress.

And last but by no means least, one of my favourites. This little doll is less than six inches tall and she made the perfect model for this cute little tutu:

Little Riley Kish wearing 'Funny Valentine' ballet costume. The tiny red foil hearts were 'table confetti'.